Creating Booking Passes
This guide walks you through creating a booking pass template step by step. Once a template is created, you can allocate passes to members manually or automatically via allocation rules tied to memberships.
For an overview of how passes work with memberships, see Booking Passes & Auto-Assignment. For common pass configurations (guest pass, hours-per-month, coach lesson pass, etc.), see Types of Booking Passes.
Getting Started
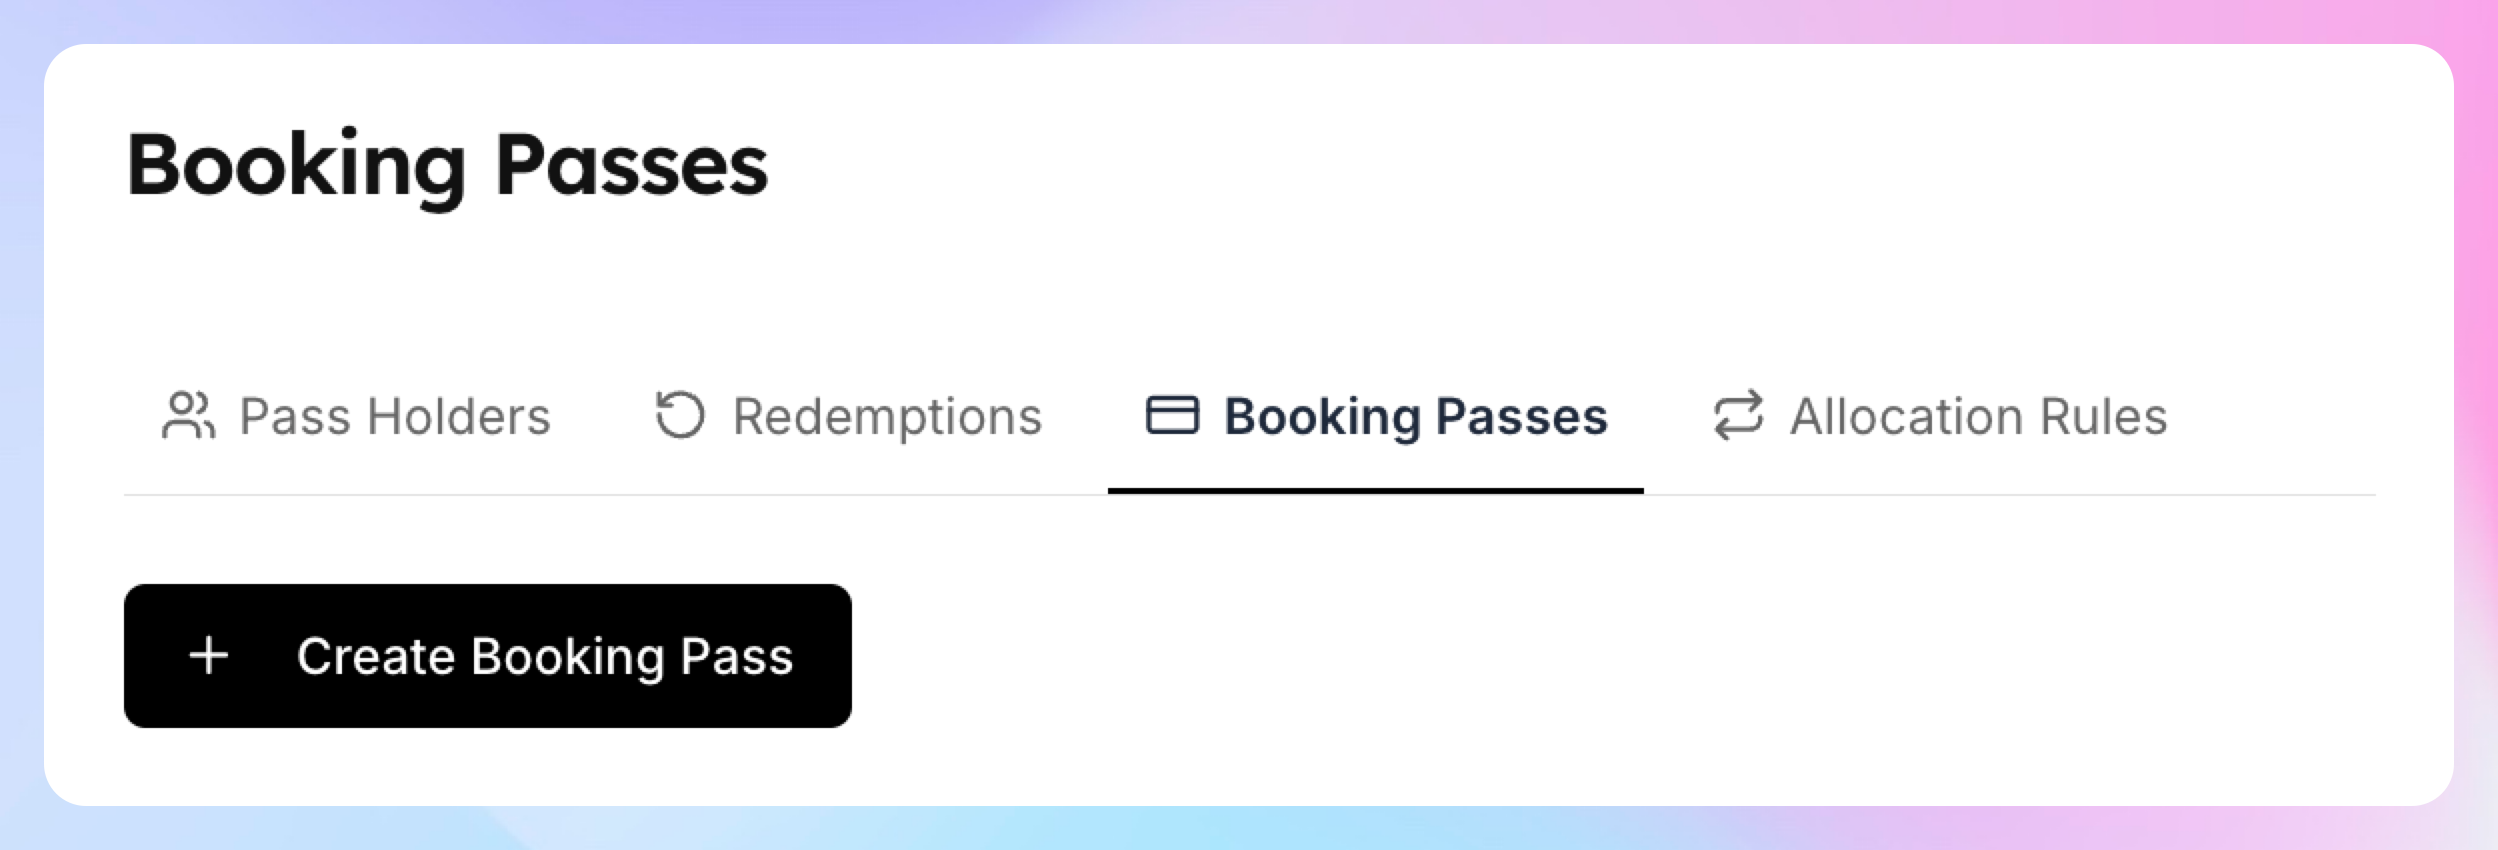
In the admin sidebar, click Booking Passes
Click the Booking Passes tab
Click Create Booking Pass
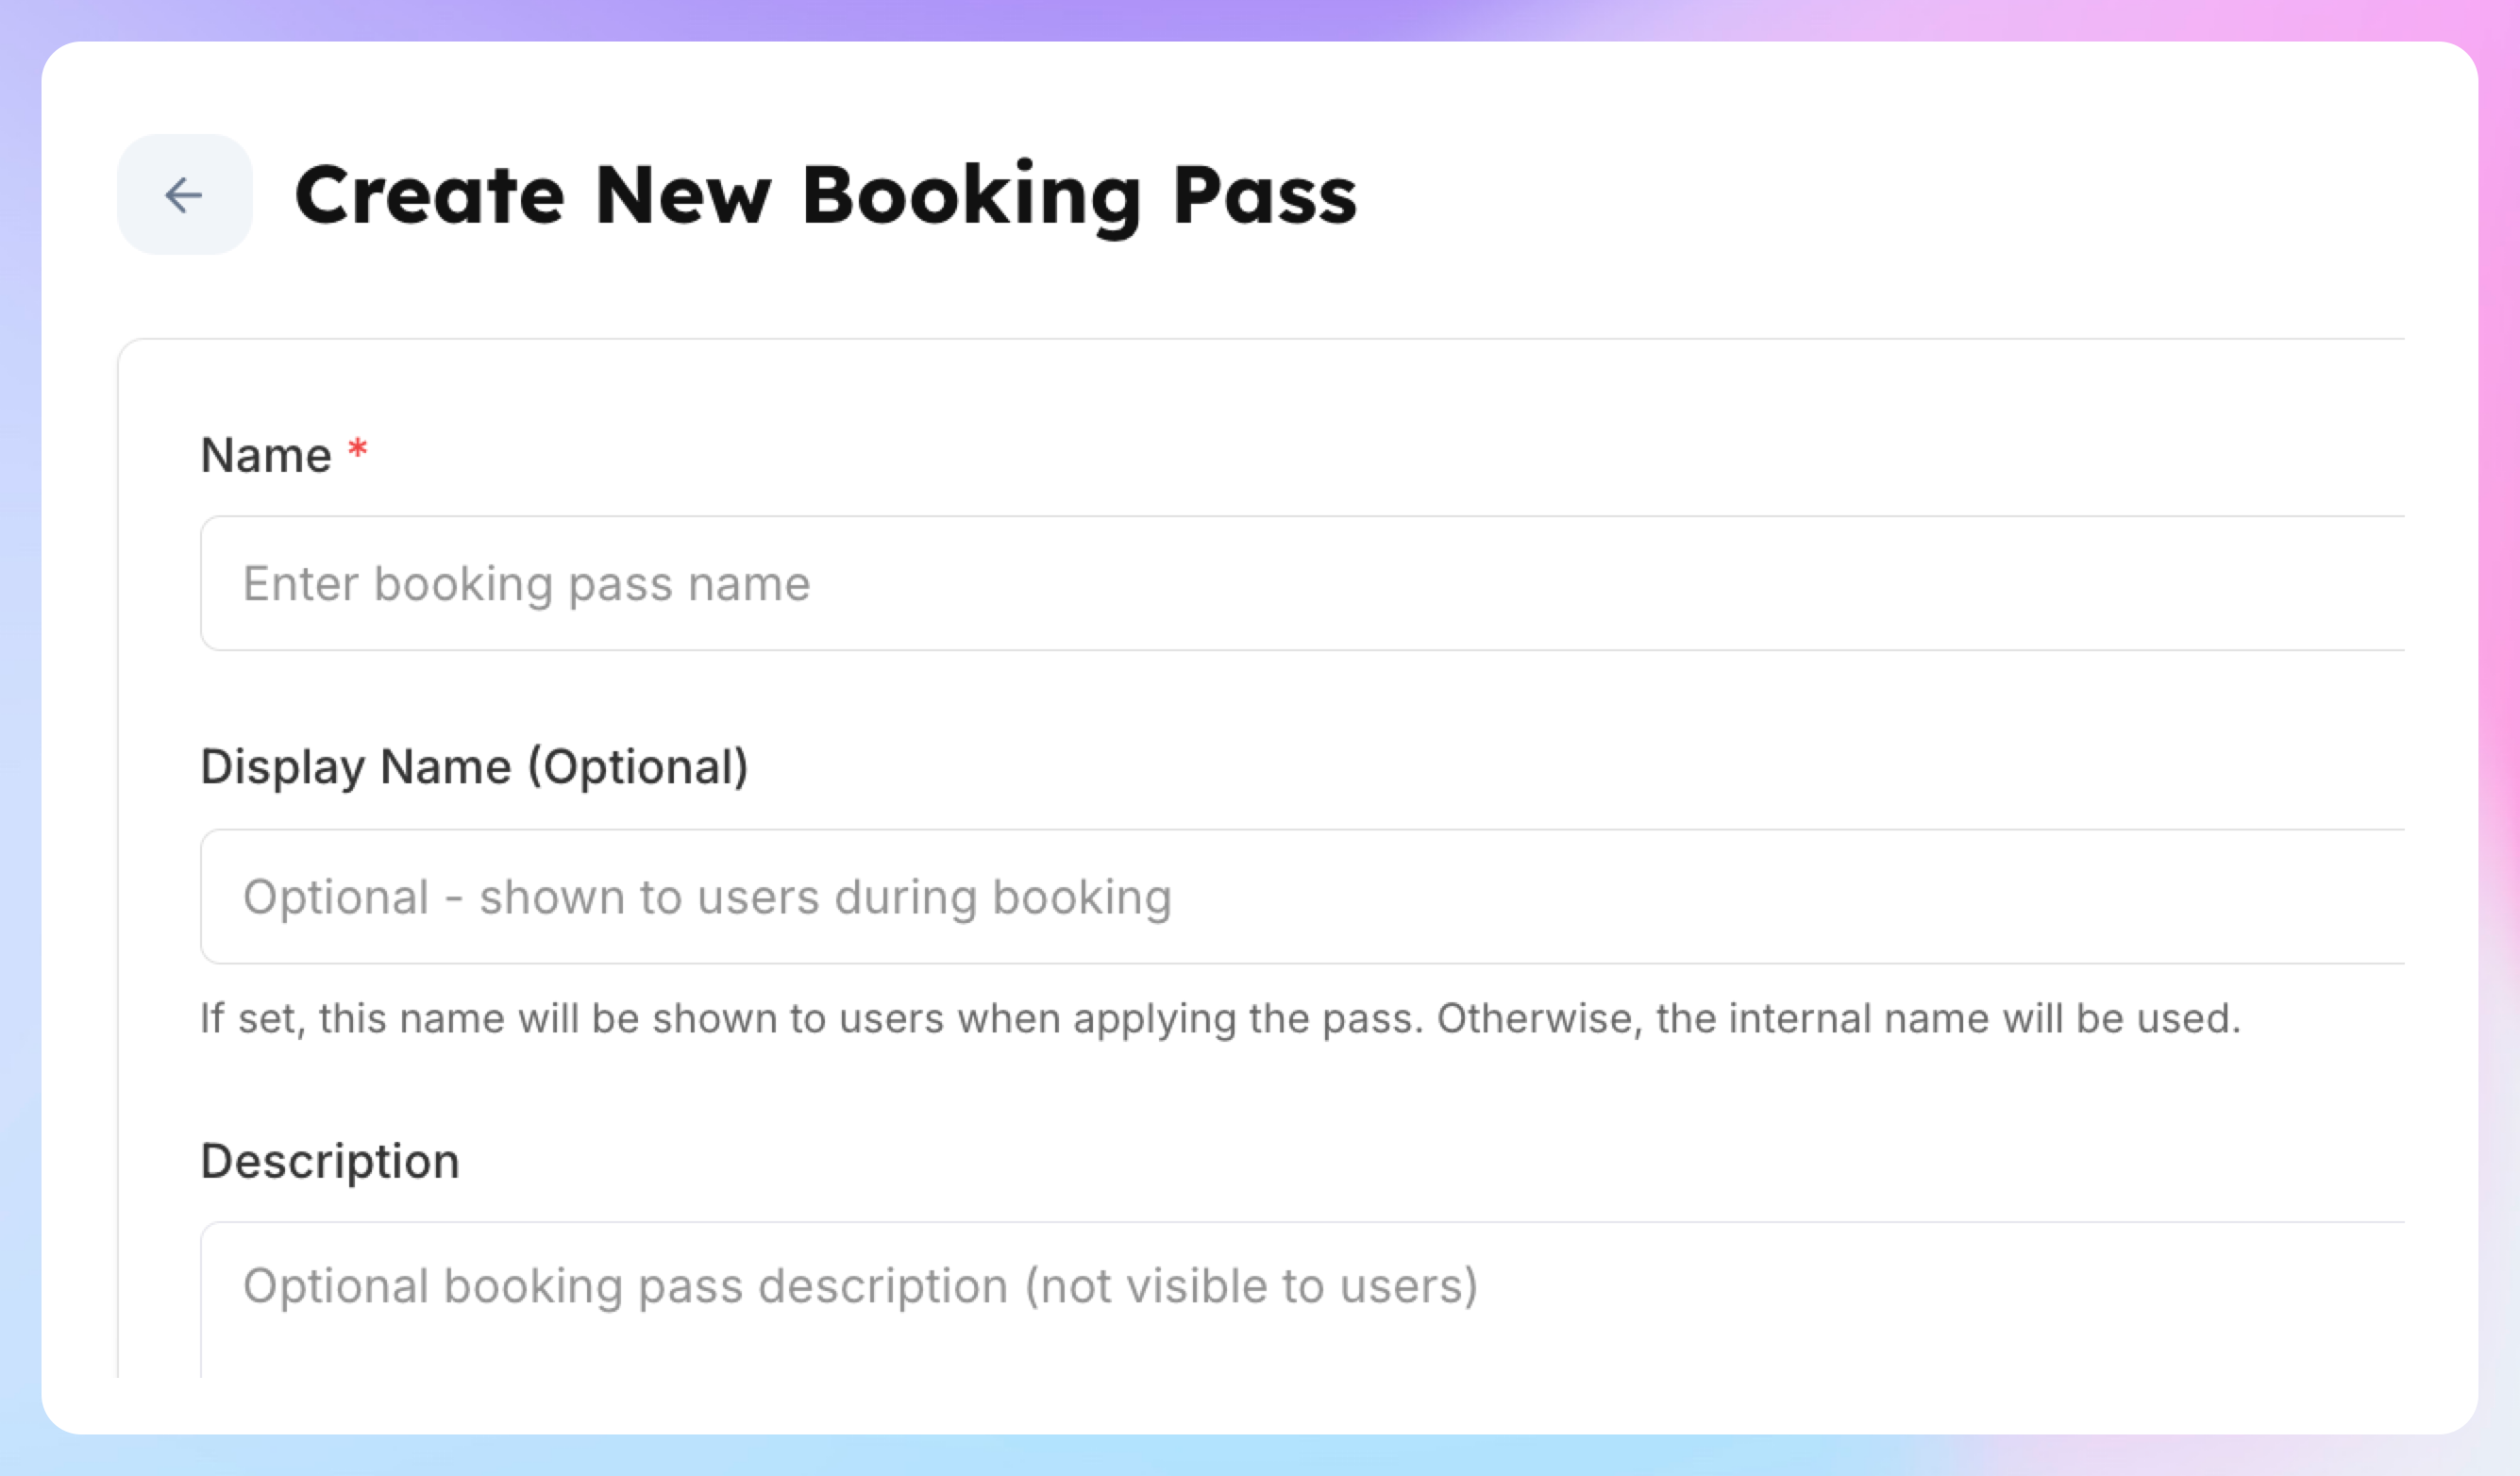
Step 1: Basic Information
Every pass starts with a name and optional details.
Name (required)
The internal name your team uses to identify this pass. Members won't see this unless you leave Display Name empty. Choose something descriptive — e.g., "Monthly Guest Pass", "Off-Peak Court Hours", "Private Lesson Credit — Coach Sarah".
Minimum 3 characters.
Display Name (optional)
The name members see during checkout when the pass is applied. If left blank, the internal Name is shown instead.
When to use it: When your internal naming is detailed (e.g., "2025 Q1 Promo — 50% Off Open Play") but you want members to see something cleaner (e.g., "50% Off Open Play").
Description (optional)
Internal notes for your team. Not visible to members. Use it to document the purpose of the pass, which membership it's tied to, or any special conditions.
Step 2: Pass Type — Event or Coach
Choose what the pass applies to: Court Reservations and Events (Clinics, Open Plays etc) or Coaches Lessons.
Select the appropriate type. This cannot be changed after the pass is created, so choose carefully.

Step 3: Redemption Mode
The redemption mode determines how the pass is consumed when used.
Whole Event / Whole Lesson (default)
One pass = one booking. Each time the member joins an event or books a lesson, one pass is consumed regardless of the event's duration.
Best for: Session-based passes like "4 open play sessions per month" or "2 private lessons per month".
By Hours (Event passes only)
The pass holds a pool of hours. Each booking deducts the event's duration from the pool. For example, a 10-hour pass used for a 90-minute booking has 8.5 hours remaining.
Best for: Flexible court time passes where members can split their hours across multiple bookings of varying lengths.
Note: The hour pool is set when you create the allocation rule, not on the template itself. The template just defines the redemption mode.
Percentage Discount
The pass provides a percentage off the booking price each time it's used. Enter the discount percentage (0.01%–100%, up to 2 decimal places).
Best for: Membership perks like "20% off all clinics" or "50% off lessons".
Fixed Discount
The pass provides a fixed dollar amount off the booking price. Enter the discount amount (minimum $0.01).
Best for: Flat-rate discounts like "$10 off any court reservation" or "$25 off private lessons".
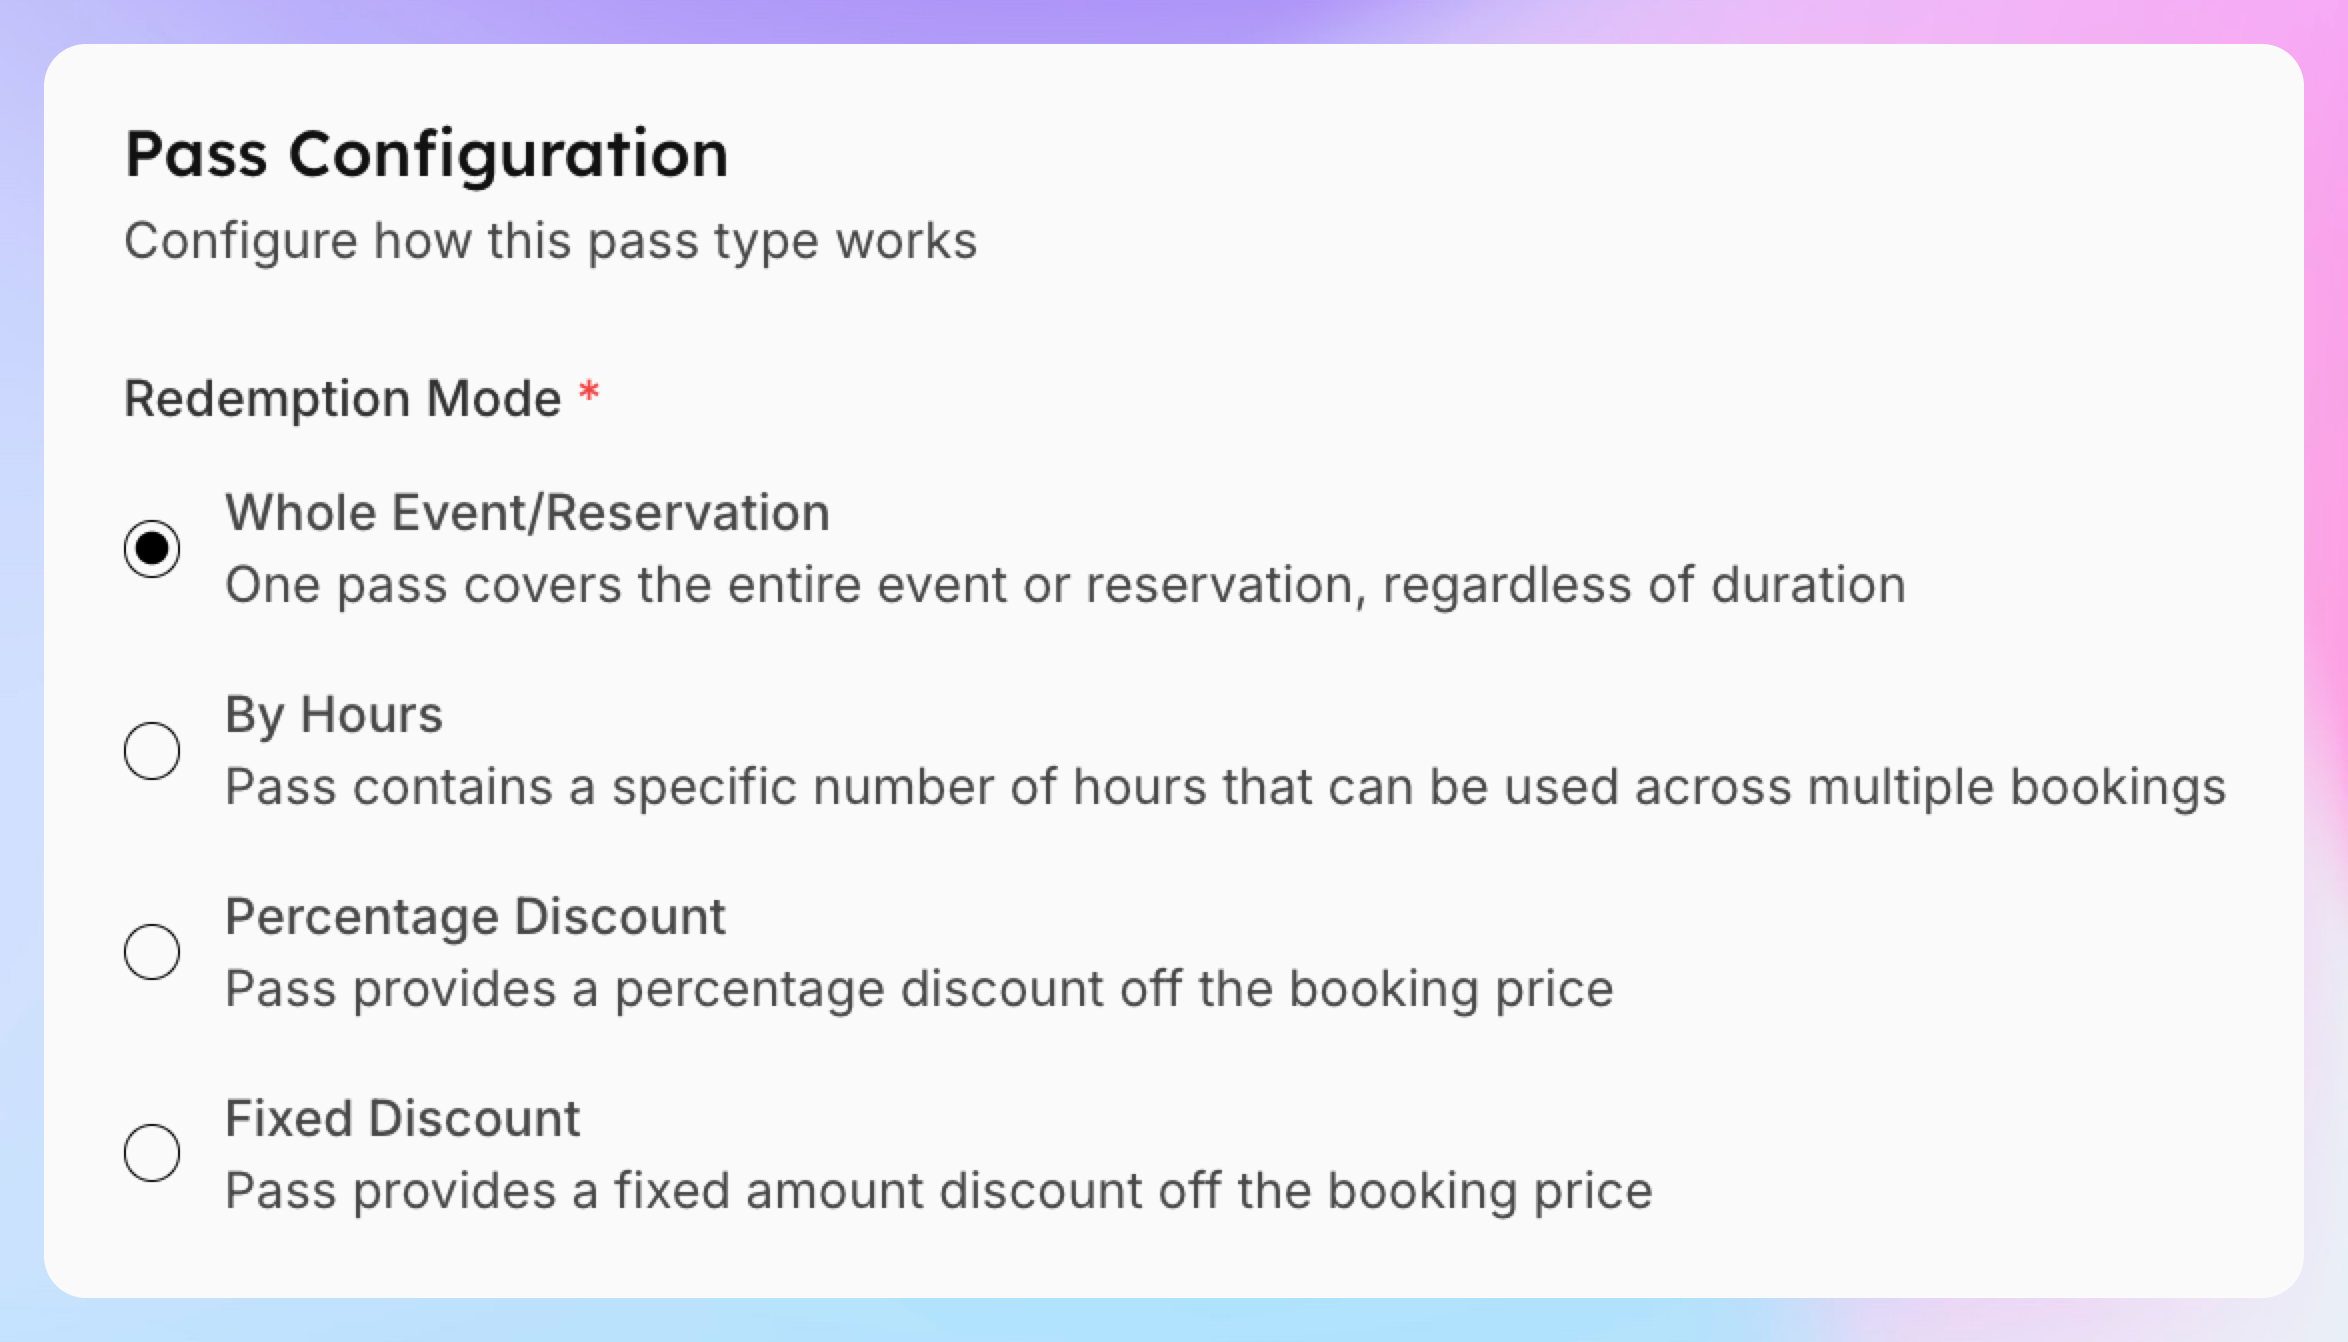
Important: The redemption mode cannot be changed once passes have been allocated to members or have redemption history.
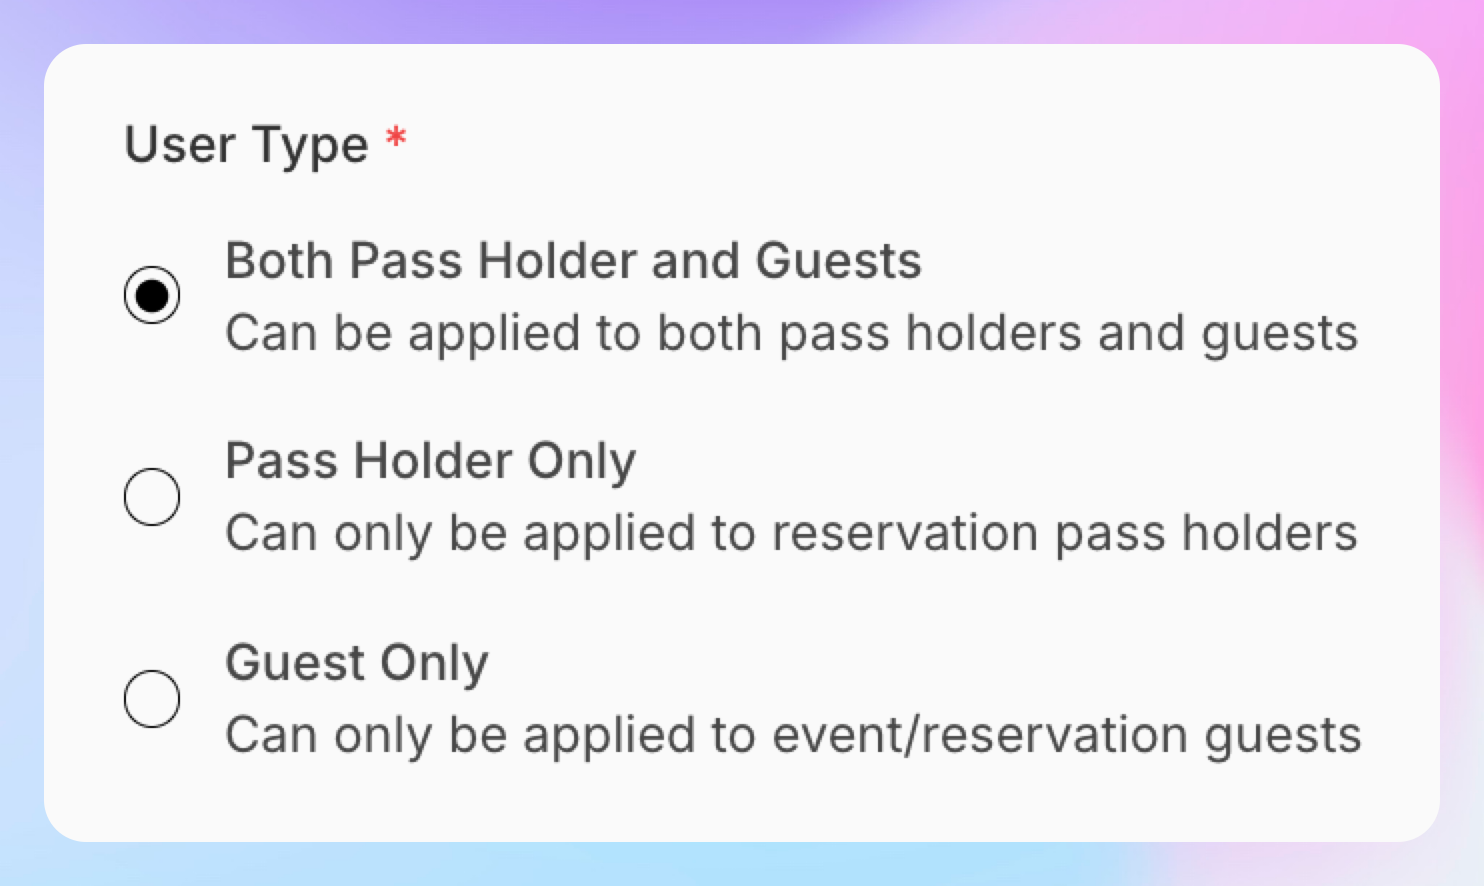
Step 4: User Type — Who Can Use the Pass
This controls whether the pass applies to the pass holder, their guests, or both.
Both Pass Holder and Guests (default)
The pass can be used by the member themselves and by any guests they add to events or reservations.
Pass Holder Only
Only the member who owns the pass can use it. Guests they invite are not covered.
Guest Only
The pass only applies to guests — not the member themselves. This is the key setting for creating guest passes. When a member adds a guest to an event or reservation, the guest's fee is covered by this pass.
Tip: To give members a clean setup, create two separate passes: a "Pass Holder Only" pass for their own sessions and a "Guest Only" pass for bringing friends — each with its own allocation limit.
Step 5: Family Sharing
Toggle "Can be redeemed by family members" to allow all linked family members to use the pass.
When enabled:
Every family member linked to the pass holder automatically becomes a pass holder too
They can use the pass independently — no need to book through the primary member
This applies to all existing and future allocations of this pass template
When disabled (default), only the person the pass is allocated to can use it.
Example: A parent has a "Monthly Court Hours" pass with family sharing enabled. Their kids, who are linked as family members, can each book courts independently using the same pass pool.

Step 6: Restrictions
Restrictions define where and when the pass can be used. The available restrictions depend on the pass type.
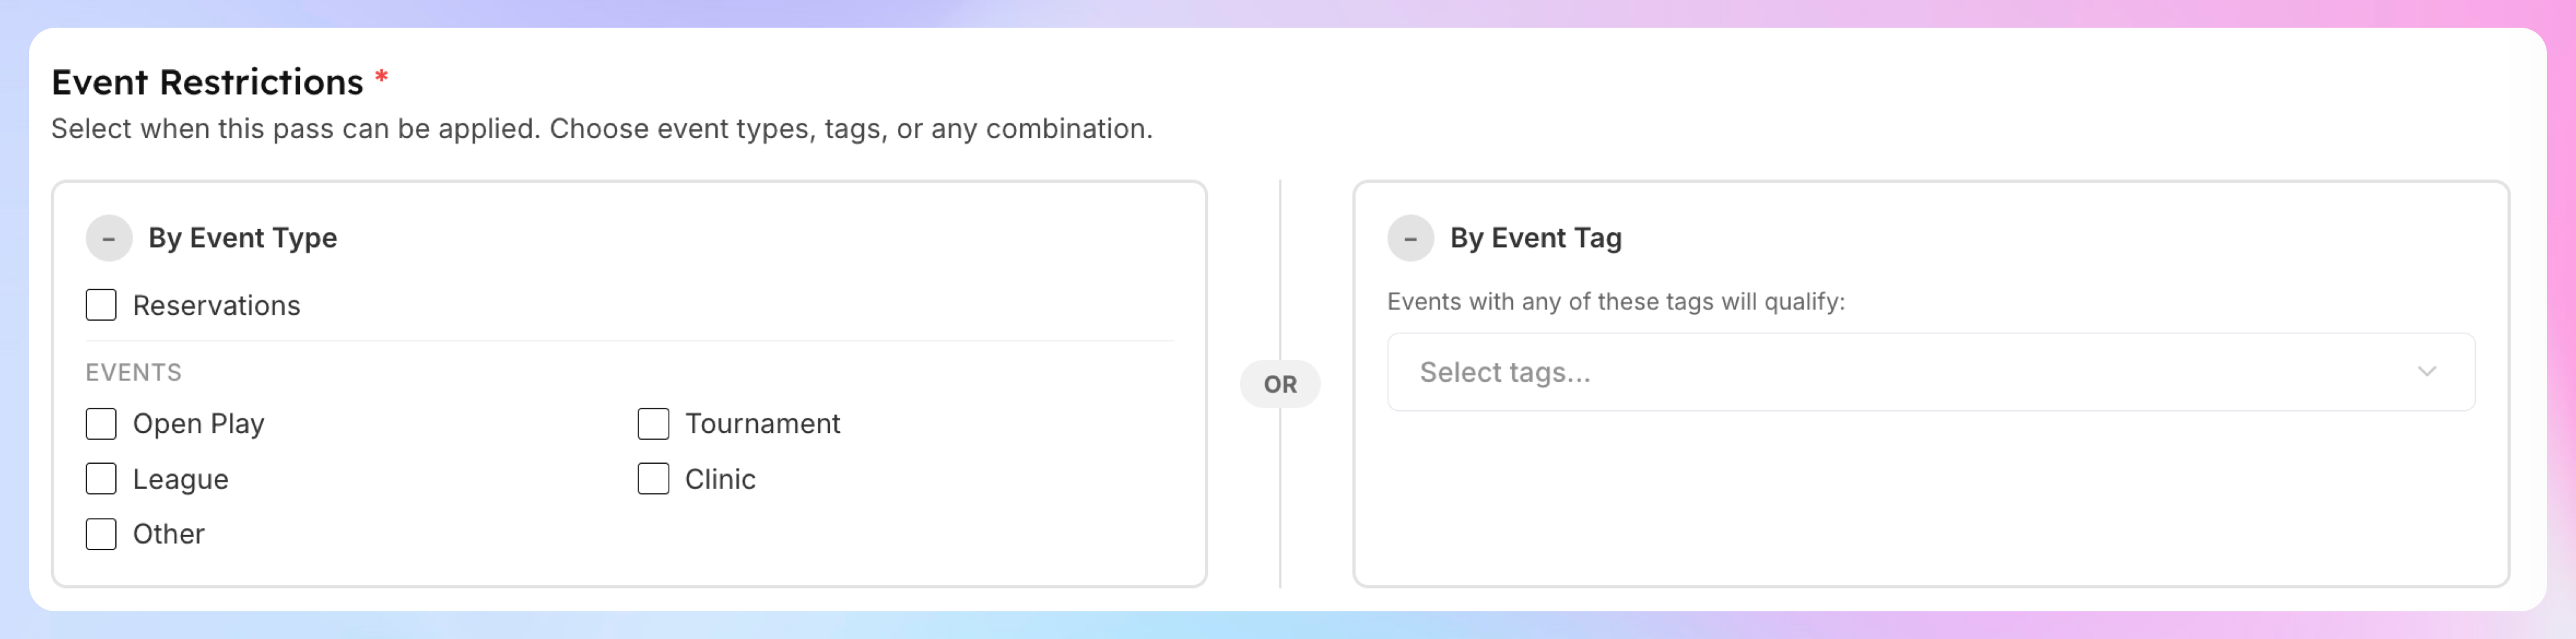
Event Restrictions (Event passes only)
You must select at least one event type or event tag. The form shows two columns:
By Event Type (left column) — check which event types qualify:
Reservations
Open Play
Tournament
League
Clinic
Other
By Event Tag (right column) — select specific tags:
Choose from your club's event tags (e.g., "Beginner", "Youth", "Ladies Night")
Event types and tags use OR logic — an event qualifies if it matches any selected event type OR has any of the selected tags.
The summary box at the bottom shows a description of what qualifies so you can verify before saving.
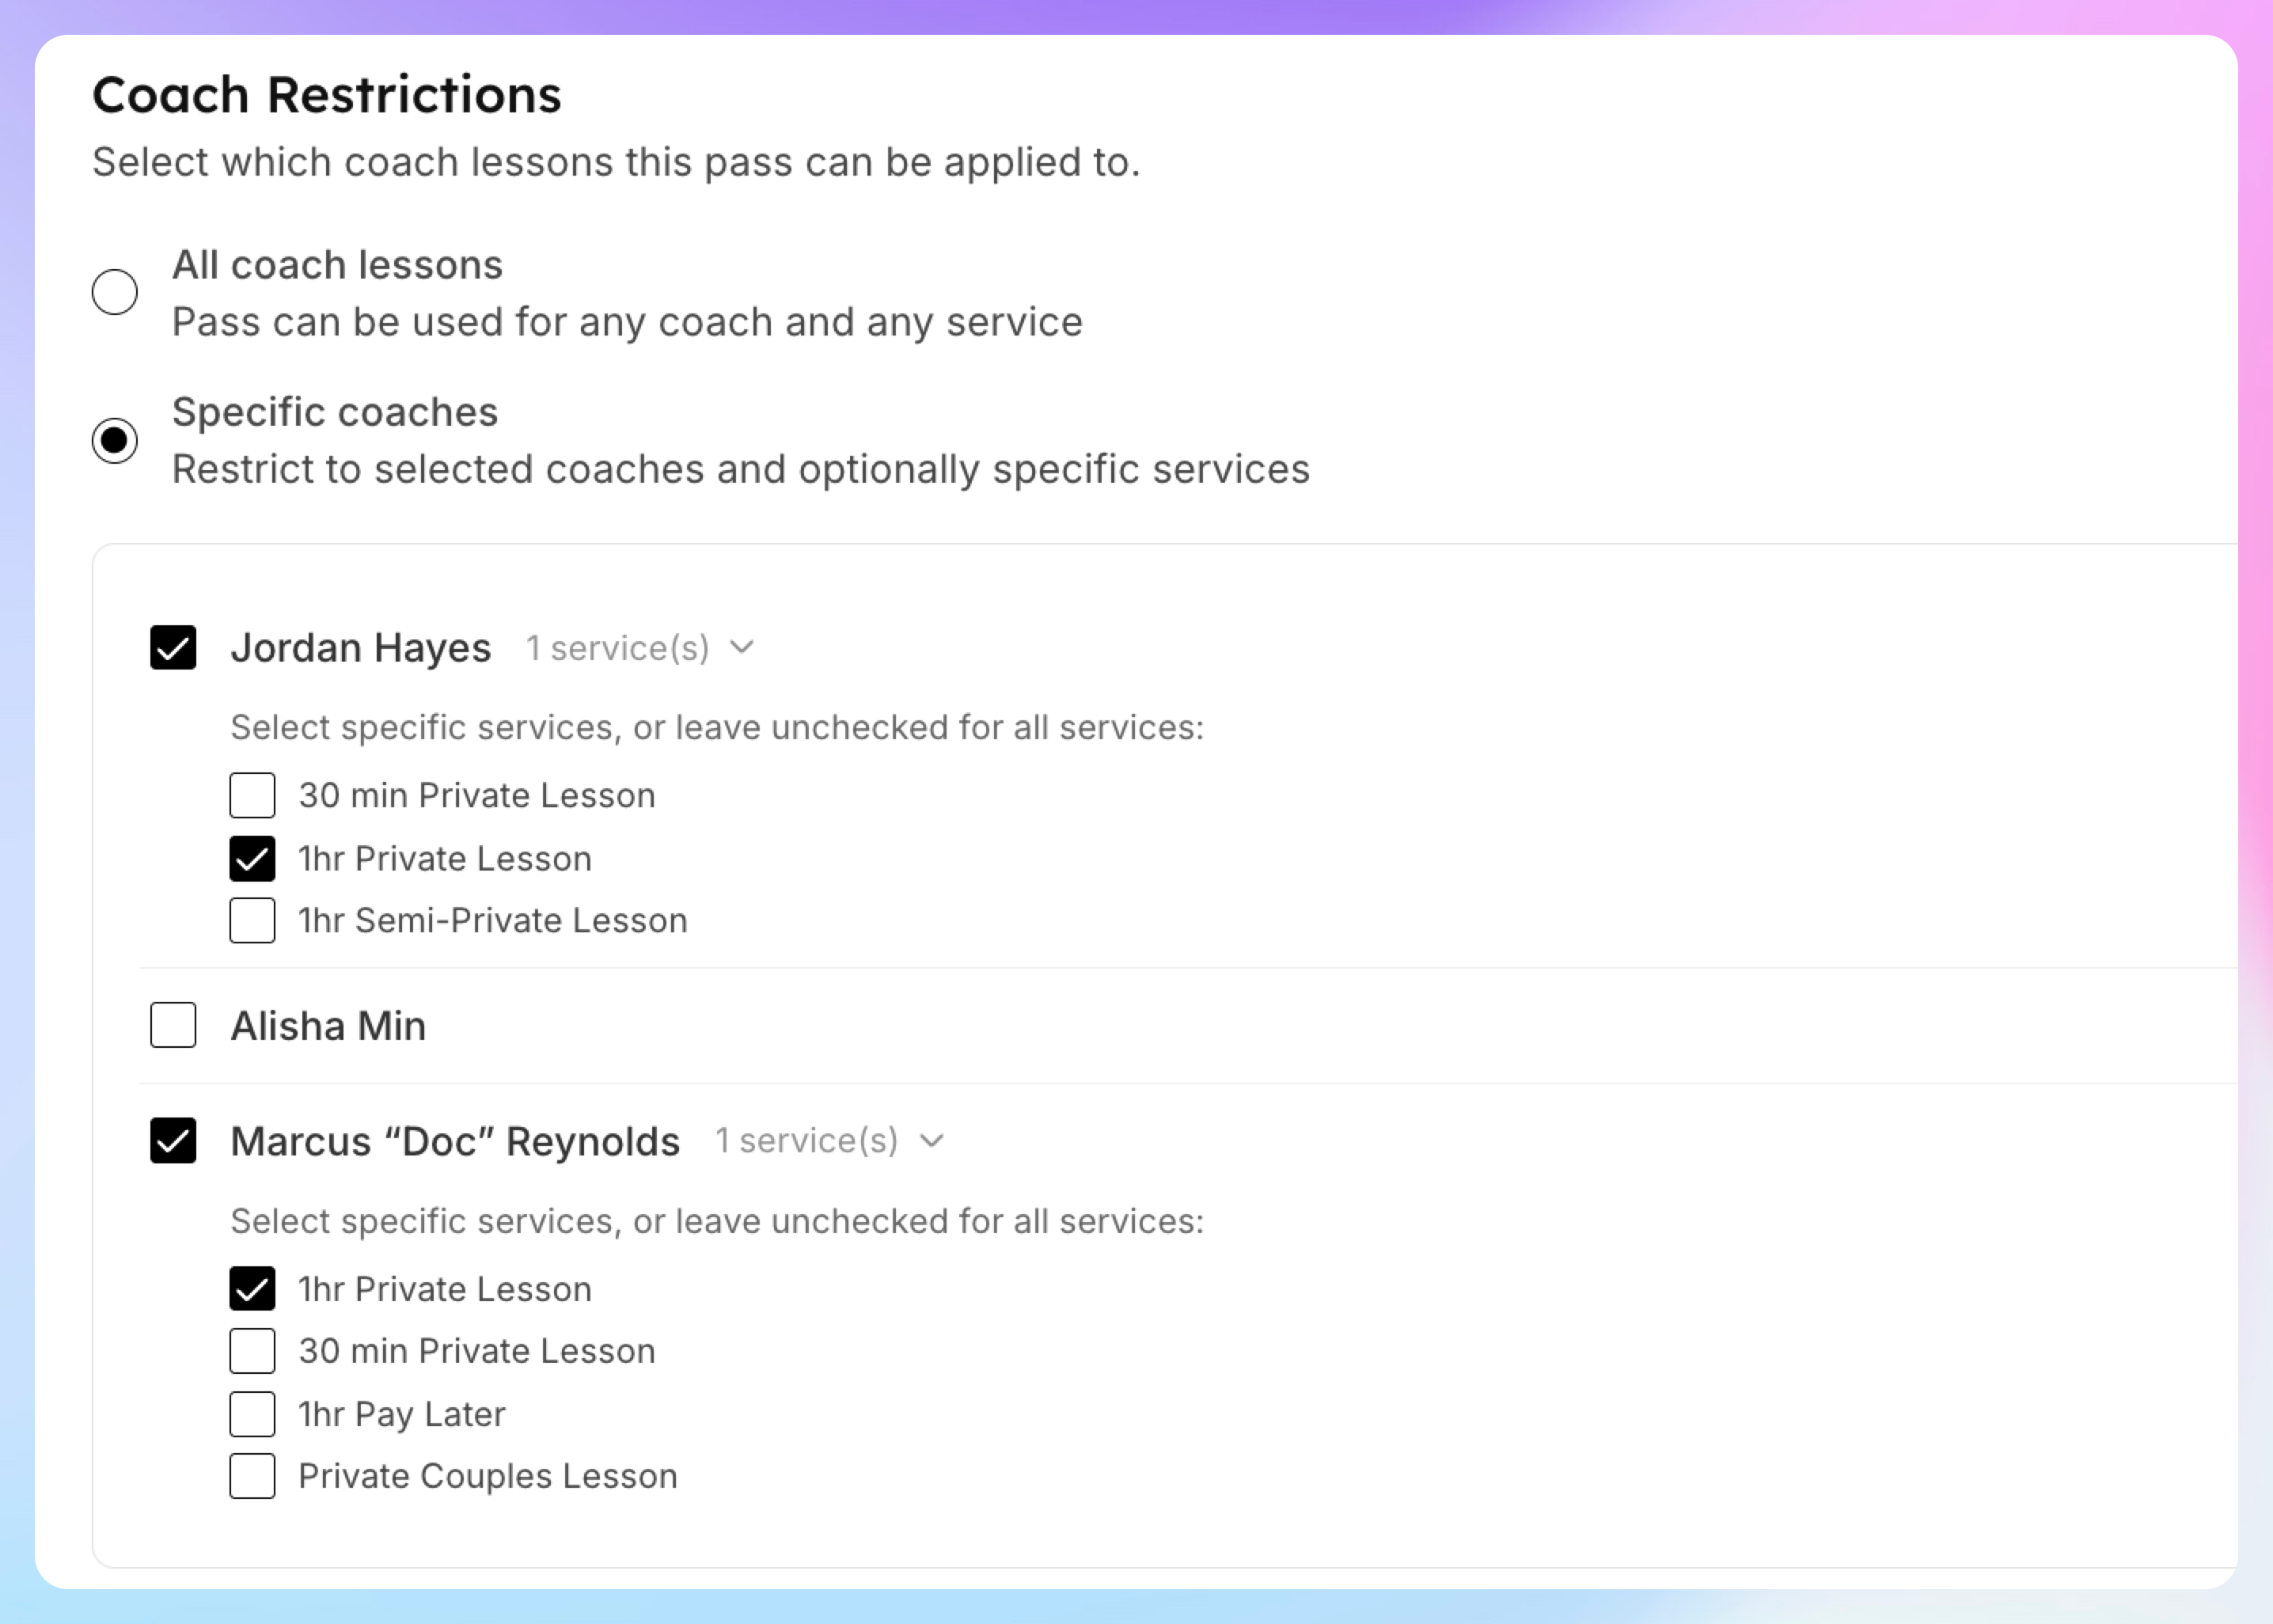
Coach Restrictions (Coach passes only)
Choose how specific the pass should be:
All coach lessons — the pass works for any coach at the club, for any service they offer. Simple and broad.
Specific coaches — select exactly which coaches the pass works for. The form shows a list of all active coaches with checkboxes.
For each selected coach, you can optionally restrict the pass further to specific services:
Click the expand arrow next to the coach's name
By default, the pass works for all services that coach offers
Check specific services to limit the pass to only those (e.g., "Private Lesson — 1 Hour" but not "90 Minute Lesson")
If a coach has no services checked, the pass covers all their services. If specific services are checked, only those are covered.
Example: A pass restricted to two Coaches "Private Lesson — 1 Hour" service. If the member tries to book their 30-minute lesson or a different coach entirely, the pass won't apply.
Time of Day Restrictions (Event passes only)
Optionally limit when the pass can be used based on the time of the event.
Toggle on "Enable time restriction"
Configure allowed time windows in the schedule editor:
Toggle which days of the week the pass is valid
Set time ranges for each day (e.g., Monday–Friday 6:00 AM – 3:00 PM)
Add multiple non-overlapping time slots per day
Add date-specific overrides (e.g., block holidays)
Time restrictions are applied in addition to event type and tag restrictions — the event must match both to qualify.
Example: An "Off-Peak Court Pass" restricted to weekdays before 3 PM. A 5 PM booking won't use this pass — the member pays full price.
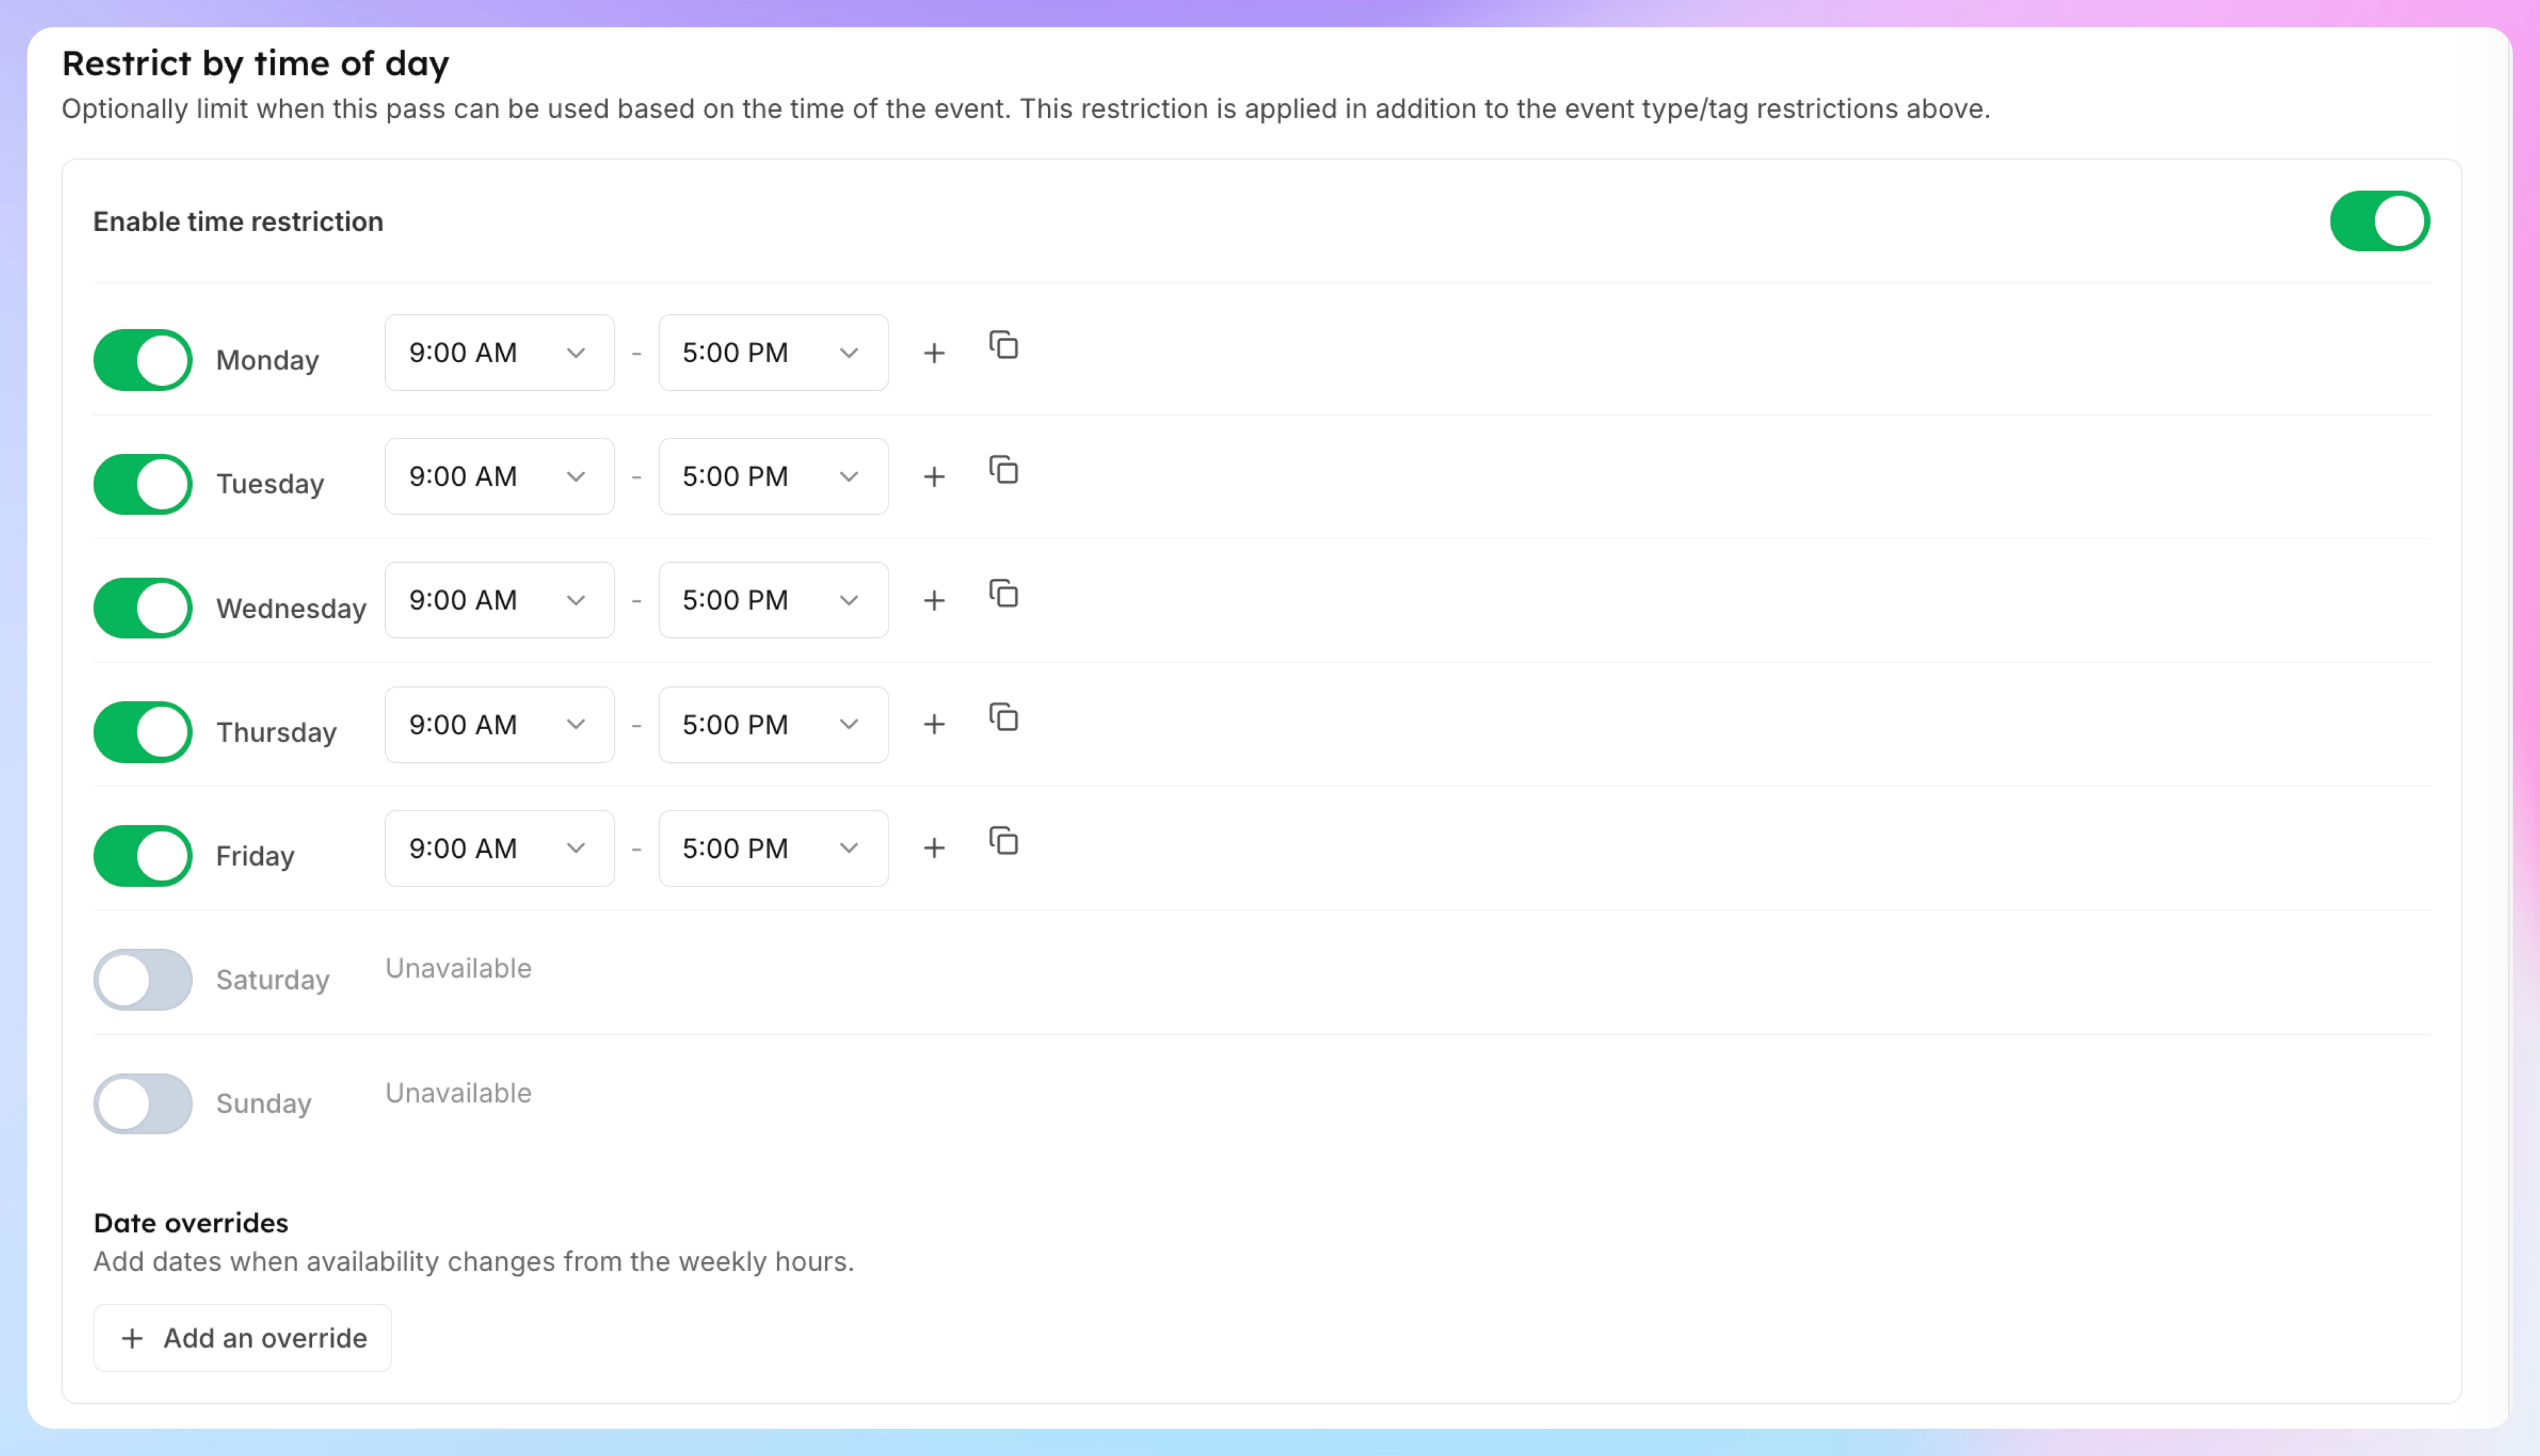
Note: Time restrictions are not available for Coach passes. Coach scheduling is managed through the coach's own availability settings.
Step 7: Save
Click Create Booking Pass at the bottom of the page. The form validates all fields — if anything is missing or invalid, it scrolls to the first error.
On success, you're redirected to the Manage page where your new pass template appears in the list.
What's Next After Creating a Pass
A pass template by itself doesn't do anything — you need to allocate it to members. There are two ways:
Manual allocation — Go to a member's profile and allocate the pass directly
Allocation rules — Set up automatic allocation tied to a membership plan. When a member activates that membership, the pass is automatically allocated. See Booking Passes & Auto-Assignment for details.
Editing an Existing Pass
Go to Booking Passes → Manage and click on a pass template to edit it.
Most fields are editable at any time, with two exceptions:
Pass Type (Event vs Coach) — locked after creation
Redemption Mode — locked once the pass has been allocated to any member or has redemption history
A yellow warning box appears on locked fields explaining why they can't be changed.
Tips
Name passes clearly — admins will see these names in allocation rules, reports, and member profiles. Use descriptive names like "Gold — 10hr Court Pass" rather than "Pass 1".
Use Display Name for clean member-facing labels — keep internal names detailed for your team, and set a short Display Name for what members see at checkout.
Family sharing shares the pool, not individual allocations — if a pass has 10 hours and family sharing is on, the entire family draws from the same 10-hour pool.
Test restrictions with the summary box — the green/amber summary at the bottom of the Event Restrictions section shows exactly which events qualify. Verify it before saving.
You can always add restrictions later — start simple. If a "Whole Event" pass for all event types is too broad, you can edit it and add tag or time restrictions without affecting existing allocations.
Combine with allocation rules for automation — the real power of passes comes from automatic allocation with memberships. Create the template here, then set up an allocation rule to deliver it when members activate their plan.